The first step into (advanced) modding is to enable the “Archive Invalidation”. With that your Starfield can load so called “loose files”, which many mods needs. This how-to will show you how to enable it.
Step 1: Find the folder for the INI
Go to the folder Documents\My Games\Starfield\ on your PC.
Tip: You can go there by simply copying this into your explorer address bar: %USERPROFILE%\Documents\My Games\Starfield\
If you use OneDrive the location is OneDrive\Documents\My Games\Starfield\
If that folder doesn’t exists simply start your Starfield once.
You should see a file StarfieldPrefs.ini there (or simply StarfieldPrefs if your Windows doesn’t show file extensions)
Step 2: Create your StarfieldCustom.ini
If you already have a StarfieldCustom.ini skip this whole step 2
Create a copy of your StarfieldPrefs.ini:
Right click on StarfieldPrefs.ini and select “Copy”
Right click on a free space in the folder and select “Paste”
After that you should have a new file called StarfieldPrefs – Copy.ini (Note: Depending on your language it will contain your locale word for “Copy”)
Rename the new file StarfieldPrefs – Copy.ini to StarfieldCustom.ini (e.g. by pressing F2 when your have that file selected. Note: When you don’t see the .ini extension, then rename it to “StarfieldCustom” – do not add an “.ini”!)
Open StarfieldCustom.ini and delete all text it contains
Step 3: Add/change INI values
Add a section [Archive] (if you already have that section don’t add a second)
Add the line bInvalidateOlderFiles=1 to your [Archive] section
Add the line sResourceDataDirsFinal= to your [Archive] section (It’s correct that there is nothing behind =)
Now your StarfieldCustom.ini should look like this:
[Archive]
bInvalidateOlderFiles=1
sResourceDataDirsFinal=
That’s it! Your Starfield is now ready for modding!
Troubleshooting
Some users have difficulties when creating this file and adding the ini settings. Here are the most common problems and their solutions!
Wrong file type
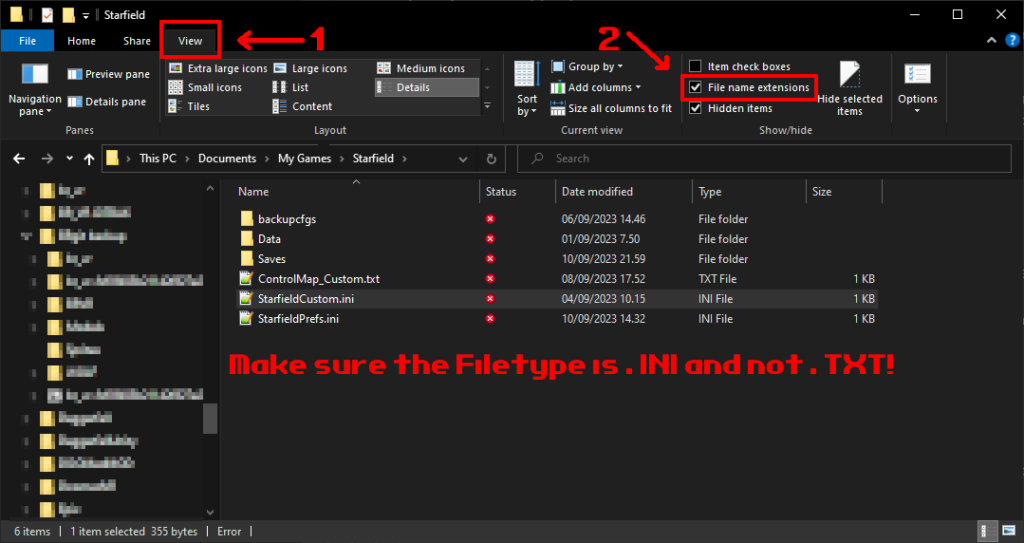
Windows doesn’t show file extensions by default. So you may have a file “StarfieldCustom.ini”, but it isn’t an INI. You can easily check that by looking at the third column “Type” in Explorer. It should contain “Configuration settings”, “INI file” or similar (depending on your language). If it is a “Text document”, then it is definitely wrong!
Solution: Either create the file again with the how-to seen above, or enable “Show file extensions” in your Windows and rename it to the correct extension.
Tip: You can enable “Show file extensions” easily, see this image made by ajantaju:

Invisible characters
When copying the lines from some websites, there may be hidden invisible characters in the copied text. Those characters will make your INI simply not working. The bad thing: You can’t see those invisible characters with the standard Windows Notepad.
Easy Solution: Delete the whole section and type it in by hand (make sure to have no spelling mistakes in there). Also make sure to press enter after the last line, so if any invisible characters are existing, they are moved to a new line where those don’t cause any harm.
Expert solution: Install Notepad++ and enable the display of invisible characters: Click on “View” in the menu bar, go into “Show Symbol” and select “Show all characters”. Then you see new symbols in the text. There should be only [CR][LF] visible at the line end (that is the default invisible character for line break in Windows)
When nothing helps
If you can’t make the setting to work, you can try this:
There is a Starfield.ini in the game folder (where Starfield.exe is). This file already contains an entry for sResourceDataDirsFinal, which is probably:
[Archive]
sResourceDataDirsFinal=STRINGS\
Change that line to having nothing behind the “=” and add the line with “bInvalidateOlderFiles=1”. So this file should now contain exact the same values as your StarfieldCustom.ini should have.
BethINI
When it just won’t work for you, you should try using BethINI.
The program will automatically create and adapt the necessary INI file(s), set the value in the correct format, and also fix broken existing INI files.
How-To: Get it from BethINI. Start it. Enable checkbox “Load Loose Files” in the bottom left. Exit and confirm save.
Credits:
m8r98a4f2


